Showing posts with label information. Show all posts

Friday, September 30, 2016

Laser hair Removal 101

Looking for a way out of excess hair growth and or lessening the amount ?

Than IPL laser is your best friend
Causes of excess hair growth
  • Aesthetic - most often related to ethnic background or heredity
  • Medical - related to endocrine disorders resulting in androgen over production. Common signs include irregular menstrual cycles, acne, alopecia, hirsutism.
So why have IPL laser hair removal?
  •  non invasive
  •  faster session times
  • suitable for small & large body areas
  •  minimal maintenance
  •  long term reduction of hair
  • It reduces the amount of ingrown hairs
  • up to 80- 90 percent reduction 
A common question often asked by my clients, is why do I require more then one treatment?
The reason a course of IPL laser hair removal is recommended, is because it’s important to catch hair in the Anagen stage of growth or the active stage.

Not all follicles grow hair at every given moment. Active follicles grow hair in cycles and at an avg rate of about 0.33mm per day.  Dormant follicles do not grow hair but can become active at any time due to hormonal changes and other reasons.
When the hair is fully connected to the blood supply, it is impossible to tell at what stage the hair growth is at, so a course of treatments will remove the hair when it is at it’s most active.

IPL Laser Hair Removal Explained

IPL only treats dark coarse hairs, it will not treat white, blonde, grey or red hair.
This is because the light is attracted to the melanin pigment in the hair follicle. The light energy absorbed in the follicle is transformed into heat which coagulates the follicle. 
Each pulse takes less than a second, small areas include the underarm, lip and chin which can take minutes to treat, areas such as the the arms, legs, chest and back may take 30 minutes or more.
At our spa we recommend between six to twelve treatments and then regular maintenance, over time treatment will be pushed out to just a couple of times a year, exactly how much depends on the clients hormonal hair growth.
I believe honesty is the best policy with my clients, unlike many un-reputable companies…
I always explain IPL hair removal is not permanent, we aim to get 80 to 90% reduction of unwanted hair, so my clients are under no false illusions about their future treatments.

Preparing for Laser Hair Removal

  • Before undergoing a hair removal treatment you must not PLUCK, TWEEZE or THREAD for 6 weeks, as this stimulates hair growth, turning it from fine vellus to coarse terminal hair
  • Ideally you don’t want to be WAXING because IPL targets the root of the hair which is temporarily removed by waxing
  • It is really important that you are wearing no FAKE or GRADUAL tan, or that the areas being treated have not been directly EXPOSED to the sun, because IPL is attracted to pigment in the skin
  • Ideally the LENGTH of your hair should be a few millimeters above the skins surface before treatment, so shaving 24-48 hours before treatment is recommended
  • So you get the most from your treatment, the IPL light is always adjusted to your particular colour, thickness, and location of hair
Laser Hair Removal Consultation
Below are a list of questions you can expect to be asked before treatment:
  1. What areas are you interested in having treated?
  2. What do you normally do for hair removal?
  3. In the last two weeks have you been in the sun or had fake or gradual tan on the area to be treated? If the answer is yes the treatment cannot be performed, as laser light is attracted to pigment in the skin.
  4. How long ago did you have hair removal?
  5. Have you waxed or plucked in the last four weeks? Again if the answer is yes, this may indicate that your hair will grow back quickly, drawing blood to the hair follicle.
  6. Before a treatment can be performed, hairs must be no longer than two mm’s as obviously hair must be showing above the surface in order to target the hairs.
  7. You are allowed to shave or trim between treatments, but no plucking, tweezing, waxing or threading.
  8. Are you aware of any hormonal imbalances you may have, such as PCOS?
  9. Are you pregnant? Diabetic? Cancer? Epilepsy?
  10. Are you currently on any medication? If you are on accutane for instance you cannot have laser for six months, as this medication thins the skin.
  11. Due to the intensity of the heat it is normal for the skin to appear a little swollen and red after; It is important that you avoid heat treatments such as the sauna, direct heat and the gym for 24 hours after treatment.
  12. It can take up to two weeks for the hair to completely fall out of the follicle, so you need to be exfoliating from the following day.
Important Laser Information
IPL is a medical treatment and should not be taken lightly, because if administered incorrectly there is a real potential to do harm.
Anyone, whether trained or not can legally operate an IPL or laser machine; A scary thought when some of the side effects include burning, pigmentary changes including hypo-pigmentation, hyper-pigmentation, scarring and reactivation of herpes viruses.
I don’t write this to scare you, because IPL does have fantastic results, and in the right hands it is safe and effective and the results are far superior to conventional methods of hair removal.
It’s your skin, so you need to make sure the hands that administer your treatment are well trained……
Because ultimately many adverse reactions can be minimised, especially with the correct use of wavelength for the person’s skin and hair type and by using a cooling system on the skin.
Ensuring you have a thorough consultation and are offered sound post-treatment advise is also key, if the treatment is to be administered safely.


Live Well, Be Healthy and Take Time to Renew Yourself,

Renu U Aesthetics.

Tuesday, July 7, 2015

Day Time Makeup

Easy Makeup Routine

A lot of people struggle with a natural looking day time makeup, it seems like it would take to long or is too difficult to do every day. But the truth is it's really not as difficult as it seems, there are a few things that you need to know to make this process simpler.

How to colour match

Look at the inside of your arm are the veins green? or blue? Are some of them green and them some of them blue?

Once you have this question answered you'll know whether or not your skin is warm, cool or neutral.


  • Warm toned skin = Green veins
  • Cool toned skin = Blue veins
  • Neutral toned skin = some veins green, some blue
                                 

Most makeups will tell you whether or not they are warm, neutral or cool. So you choose the one based on the observations you make of your skin.

Then when you are trying to pick the shade of foundation don't match it to your cheek, match it to your neck! The colour should look as though it's disappeared on your skin.


Looking at this picture you can see that the second one to the left is the nearest match to the model's face. And it's best to compare multiple colours to compare and make sure that you have chosen the right colour for your face. You don't want to look orange or yellow or too pink because it will make you look like you are wearing a mask.

Contouring/Highlighting/Blush

It's very important to put some colour back in your face after you have made it all one smooth consistent colour. You can do this by adding contouring, blush and highlighting this adds dimension to your face.


Contour
Use a brown shade that is a couple shades darker than your natural skin tone. For a fairer skin tone choose the lighter coffee colour, for darker skin tones choose the darkest of the browns and medium skin tones the medium brown. Take a smaller blush brush apply a little colour to it, and then tap it off onto a paper towel. This ensures that you won't have too much colour on your brush, swipe this underneath your cheek bone from the ear lightly out towards the center of the face on both side. Pat the left over amount on the outer corners of the forehead. Dust off the brush and then use the now clean brush to brush the contouring out so there are no lines or super dark spots. Remember! A little goes a long way. 

Blush
With your blush you can go a little bit heavier. Smile wide and take pink blush for cool skin tones and a more orangie blush for olive skin tones. Tap off the excess and apply to the apples to your cheeks. Wipe off your brush and blend it out towards the hair line.

Highlight
For Highlighting take a fluffy brush and use the lightest shade to highlight, or if you are very dark of complexion take the lightest brown (coffee/caramel coloured) and apply to brush, tap excess and apply above your blush. You can also apply to your forehead, bridge of the nose, brow bone under your eyebrows. 

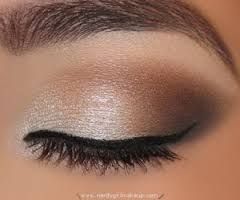
Eye Makeup

For day time makeup that looks natural it's best to choose browns, and pinks/purples.

You could use your contouring pallet if you like and make your make up look even more natural by taking your lightest shade and highlighting the brow bone right beneath the eyebrow. Then blending in the colour closest to your skin tone or a LITTLE darker over the lid, and along the bottom lash line. Then you take a darker colour and lightly press it into the crease of your eyelid. change brushes and blend the darkest colour out with a clean brush, this will help to keep you from adding too much product.

You can do the same thing with the store bought tri-packs, which are usually intended for those purposes.

Line your eye and apply mascara. Usually you would do a thin line of liner only on the top lid for day time looks. You can add the darkest of the eye shadow shades in a light dusting on the bottom lash line.

Something like this:


Lips

For the lip colour a nice natural shade for day time makeup or a coat of lip gloss is all you need for a natural look during the day.


You should look something like this when you're all done.


We hope that this helps everyone struggling to do their makeup every morning. Choosing colours really is about picking the ones you like best on you and finding a makeup routine that fits you. However once you've been doing your makeup for a while you will find that this morning routine becomes second nature. You'll know what colours match and what you like to see in the mirror. You'll be shocked when people don't believe that you have makeup on in the first place.

Live well and be healthy,

Renu U Aesthetics.

Friday, June 5, 2015

Foot care: Necessity or Hoax


Are you taking care of your feet?

We know that a lot of people feel like manicures and pedicures are just cosmetic!  But is that true? Do you really need to get pedicures regularly? Or is it really just for the pretty colours we all put on your toes when you come in?

To be very blunt... No it isn't!

Foot care is very very important, your hands and feet need your diligent care. We know it sounds like a lot of work and a lot of money, but as you walk and age your feet will truly thank you for taking care of them. Taking care of your feet can help you to avoid things like fungal infections, bacterial infections and even more serious foot disorders that are related to the way you walk and callus build up etc...

First things first when it comes to foot care you need to find yourself a very well educated aesthetician. You should always make sure that you find someone who has taken (and passed) an aesthetics course. Whether it be someone who has gone to a private educational facility or a provincially accredited college. Someone who understands disease prevention and spread, here in Ontario aesthetics aren't regulated. Right now anyone can set up shop and give people pedicures, manicures, waxing and facial services. There are many associations that are trying to make it so that you must have a licence to perform any aesthetics service, but until that day comes it's important to know what you are looking for!

Having taken into consideration this very important first step, the second thing you need to know is that if your feet are in poor health or condition that you are putting yourself at risk for infections. Some of the reasons are:

Cracked heels: 

These are essentially open wounds on your feet. Some cracks can become so deep that they bleed, this put you at risk for infection. Bacteria can become trapped in the cracks of the sole of your feet, where they will multiply and can cause infections. Sometime these infections can become very severe and require antibiotics.

Treating these cracks can be very difficult if you are unsure of how to deal with them, or if you have an uneducated aesthetician caring for your feet. It's important that you get the proper recommendations for home care and that the person who cares for your feet knows which direction to file cracks, as if they don't they can open the cracks wider causing you to be in more pain and that much more susceptible to infections.

Overly callused feet:

Build up of callus can be a sign of improper footwear or that your feet are rubbing in a strange way. However sometimes it can cause you to walk in a strange and painful manner. So taking good care to remove any excess of callus is very important. It's very good aesthetic practice to recommend that clients come back for multiple visits some times even twice a month, to slowly remove large callus build ups. If you take off too much callus at once you can cause your immune system to feel that your feet are under attack and will cause more callus to form.

A good aesthetician will recommend that you take care of your feet at home and suggest the appropriate tools for your specific callus situation. Usually that you file your feet lightly in the shower once a week, after you have done all your regular shower routine. This will ensure that your feet are just soft enough to file. 

Long toe nails:

When you do not trim your nails on a regular basis they can rub inside your shoes. This can cause lifting, lifting leaves you susceptible to fungal infections. Once your toe nails have lifted and bacteria has had a chance to enter under the surface of your nail plate, it becomes trapped in the dark and humid environment of our toes. That can quickly become a fungal infection that can spread to the rest of your toes, it can become quite painful if left untreated.

It's very important to keep your nails trimmed to a couple millimetres of white left, and a square shape. This will ensure that you aren't hurting yourself but you don't cause any lifting.

Ingrown toe nails:

Sometimes you can have pain in your big toes, going to get a regular pedicure can make sure that you catch any potential ingrown nails before they cause you too much pain. 

Sometimes it can be from cutting your nails too short at home and the nail is having to grow over the skin again. However sometimes the nail can curve inward very deeply and will need the corner cut off. Having someone like your pedicurist look at your feet from a better angle can help a LOT, and they can decide whether or not it's a big deal. If your aesthetician thinks that it's a big deal they will suggest you go see your family doctor and let them take a look. That goes for all foot disorders.

Fungal infections:

To expand on the subject of fungal infections, it's important to go to an educated aesthetician, because we know how to disinfect our tools properly. This prevents the spread of bacteria, fungus and viruses. We will also be able to tell you when we think you should head to the doctors. We also have professional pedicure products that are generally for sale, some of which are targeted to treating fungal infections. 


So when it comes to your feet whether you have dry skin, are unable to reach your feet, or even diabetic it's very important to visit a trained aesthetician. Don't be afraid that you might have ugly feet! We've certainly seen worse! We recommend that everyone keep a steady monthly appointment to care for their feet, if that isn't possible bi-monthly with a good home care routine can help tremendously. We want you to come in and let us help you stay healthy and strong.

Live well and be healthy,

Renu U Aesthetics

Wednesday, May 27, 2015

Nail Extensions: What's the Deal?

Acrylic .VS. Gel

The great debate is on! What is better for your nails acrylic or gel? What are you getting when you go to the spa and get your nails done? Here are the answers you are looking for. So many places will upsell their "gel" nails, but are you truly getting what you're paying for?

Here is the truth

When acrylics are being applied there is an acrylic powder and liquid, they are mixed to the appropriate consistency. Then they are apply to the nail plate after the prep was done to ensure that your enhancement doesn't come off. They do not need a light to become solid the enhancements will solidify all by themselves once mixed together.

When true gel nails are being applied the nail prep is done and a clear gel (similar in consistency to toothpaste) is applied to the nail. You place your hand under a UV or LED light to solidify the product. Once removed from the lamp you will find that they have a sticky film, your aesthetician will wipe this off for you and you're ready to go.


These are very different procedures as you can tell. 

Some salons may finish off your acrylics with a gel top coat, which is used to seal gel polish (or shellac as many people know it as). This makes your nails shine bright and stops it them from yellowing, which happens to acrylics over time. This helps clients who haven't been educated in the difference think that they have had gel nails applied when they truly have not.

Don't let yourselves be played the fool!

Some salons are even carrying DENTAL acrylic because it's cheaper to purchase than the regular acrylic used for nail enhancements!

A caring aesthetician will take into consideration what you are looking for with your nails. Are you looking to grow out your nails? or are you looking to have extra length and point you toward gel polish or gel. Most aestheticians won't deal in acrylic anymore for safety reason, both for you and themselves. Acrylic dust can be rather irritating to skin, eyes and lungs! Many types of acrylic can cause contact dermatitis, an unpleasant skin rash that can need medication to get rid of. Also with continued exposure to acrylic powder and liquid you can develop allergic reaction that can cause inflammation and infections.

But if you are aware of what's being done to your nails you'll never be ripped off or put at risk.

Live well and Feel Great

RENU U Aesthetics